This guide lists the boss names (using the RPGe | PS1 | GBA/PR translation names respectively), classifications (with Heavy having specific properties for stuff like immunities and debuff durations), stats (PD/MD are physical/magical defense, PE/ME is evasion), status vulnerabilities, a basic description of the boss AI, and tips for tackling the bosses. Note that there's four versions with various differences, so if there's a version-specific strategy to mention, I'll denote that using these icons (otherwise the strategy will work in all versions):
![]() SNES/PS1
SNES/PS1
![]() GBA
GBA
![]() Pixel Remaster
Pixel Remaster
![]() Matrix (Discontinued)
Matrix (Discontinued)
If you find any errors or have extra tips, let me know through Twitter or Discord (Mega64#3670)
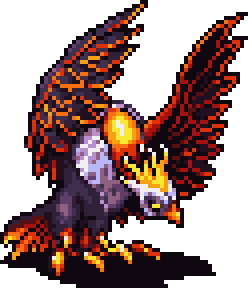 |
FORM 1
Name: WingRaptor | Wingrapter | Wing Raptor (Heavy)
Stats: 250HP | 25MP | LVL 1
Defenses: PD 0 | PE 0% | MD 10 | ME 10%
Vulnerable to Death, Poison, Blind, Old, Sleep, Paralyze, Confuse, Berserk, Silence, Stop, Slow.
|
Attack Patterns: Wing Raptor will do two attacks (which can be either a physical attack or party-wide Breath Wing attack for 1/4 Max HP damage) before switching to a second form that will counter physical attacks with a defense-piercing special attack. Otherwise, this second form will do nothing for two turns before swapping back to the first form.
TIPS:
* Attack Form 1 while you can. You should get two rounds of attacks before it switches forms. Don't get too greedy and try to rush more attacks before it switches, or else you might eat a nasty counter.
* Don't attack Wing Raptor while its wings are shielding it (Form 2). Use this time to heal with Potions if needed. Don't bother using Phoenix Downs since those are expensive, you don't get EXP from this boss, and after it swaps back to Form 1 it'll be nearly dead anyway.
|
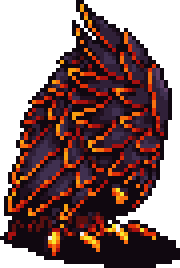 |
FORM 2
Name: WingRaptor | Wingrapter | Wing Raptor (Heavy)
Stats: 250HP | 0MP | LVL 2
Defenses: PD 20 | PE 40% | MD 10 | ME 10%
Vulnerable to Death, Poison, Blind, Old, Sleep, Paralyze, Confuse, Berserk, Silence, Stop, Slow.
|
|
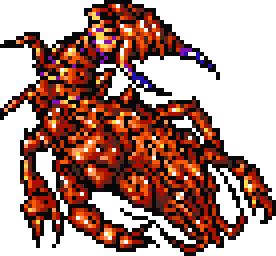 |
Name: Karlabos | Karl Boss | Karlabos (Heavy)
Stats: 650HP | 100MP | LVL 5
Defenses: PD 0 | PE 0% | MD 10 | ME 0%
Weak to Bolt.
Vulnerable to Stop, Slow.
|
Attack Patterns: This boss can do three things: Physical attack, use a paralysis-inflicting special attack, or use Tail Screw, which lowers one target to single-digit HP.
TIPS:
* Don't be afraid to use Potions if you don't have White Magic (or your White Mage is paralyzed). Tail Screw can be nasty, and it's better to be safe than sorry, especially with paralysis being thrown around so much.
* Blue Mages may want to hit L5 first so they can use Goblin Punch to do significant damage (GP does x8 damage if your level matches the enemy's). Black Mages will obviously want to use lightning magic.
* Although it sucks and I don't like to recommend it, some jobs for specific challenges may have to grind to have enough damage output to beat him. White Mages get more attack multipliers at L8, Thieves at L5 and L10/L11 (depending on character). Solo challenges have it even tougher thanks to paralysis and will likely need to grind Elixirs from Moldwynds in the Wind Shrine.
|
 |
FORM 1
Name: Siren | Siren | Siren (Human, Heavy)
Stats: 900HP | 200MP | LVL 2
Defenses: PD 0 | PE 0% | MD 20 | ME 0%
Vulnerable to Death, Stone, Poison, Blind, Old, Paralyze, Confuse, Berserk, Stop, Slow.
|
Attack Patterns:
Siren starts off casting various spells, buffs (Haste, Protect, Cure), debuffs (Silence, Slow, Sleep), or attacks (Ice, Bolt). After three rounds, she'll change to her undead form, which does three rounds of physical attacks, with her special attacks poisoning characters. After this, she reverts to her first form and everything repeats.
TIPS:
* Her human form has high magic defense but low defense, with the reverse true for her undead form. Mages will want to heal during her human form before blasting her with Fire or Cure, while physical jobs should attack her during her human form and then heal or throw Potions at her during her undead form.
* Siren hits too hard for it to be worth healing the poison from her Undead form, so it's better to wait to heal it after the battle is over.
* Don't forget that the Knight's !Guard ability nullifies all physical damage, which can be handy for her Undead form, especially if there's low-HP allies to Cover or you can combine it with the Monk's Counter passive.
* If you need better weapons, there is a Flail for the White Mage/Freelancer at the beginning of the Ship Graveyard, while Skeletons have Daggers as their rare drop for Thieves.
|
 |
FORM 2
Name: Siren | Siren | Siren (Human, Heavy, Undead)
Stats: 900HP | 200 MP | LVL 2
Defenses: PD 12 | PE 0% | MD 0 | ME 0%
Weak to Fire. Absorbs Poison.
Vulnerable to Death, Stone, Blind, Slow.
|
|
|
|
Name: Magisa | Magissa | Magissa (Human)
Stats: 650HP | 200MP | LVL 8
Defenses: PD 0 | PE 0% | MD 0 | ME 0%
Vulnerable to Poison, Blind, Silence, Stop, Slow.
|
Attack Patterns:
Magisa will alternate between a L1 Black Magic spell and either Aero, Drain, or a physical attack. When Magisa hits under 300HP, she will summon Forza and cast Regen on him. Forza only uses physical attacks.
TIPS:
* Magisa can (and should if possible) be silenced. Doing this will nullify most of her offense. Be sure to reapply Silence occasionally, as it will wear off over time.
* If you have the offense, once Magisa's down to slightly over 300HP, you can rush and kill her before she gets a turn to completely skip the step where she summons Forza. Useful abilities for this include the Monk's !Focus, and Goblin Punch if your !Blue users are L8. If desperate, breaking the Frost Rod works great for this as well.
* Black Mages can use Sleep on Forza. Blue Mages can blind Forza with Flash, found in North Mountain by using an Ether on Tombstones. White Mages can cut Forza's damage with Protect (best used before he shows up, while Magisa is Silenced and helpless). And there's always the ol' !Guard/Counter combo.
|
 |
Name: Forza | Faltzer | Forza (Human, Heavy)
Stats: 850HP | 100MP | LVL 8
Defenses: PD 3 | PE 0% | MD 5 | ME 0%
Vulnerable to Poison, Blind, Old, Sleep, Paralyze, Confuse, Berserk, Silence, Stop, Slow.
|
|
 |
Name: Galura | Garula | Garula (Creature)
Stats: 1200HP | 100MP | LVL 3
Defenses: PD 7 | PE 0% | MD 4 | ME 0%
Vulnerable to Death, Stone, Toad, Poison, Blind, Old, Paralyze, Confuse, Berserk, Silence, Stop, Slow.
|
Attack Patterns:
At first, all Garula does is physical attacks. Once under 800HP, Garula will counter any attack with a physical attack, plus a chance of either a second attack or a special attack that inflicts HP leak. Garula can also untoad itself if Toaded for...some reason.
TIPS:
* Though Garula can untoad itself, you can still use Toad Song as a Blue Mage to force it to waste turns doing so while you attack it (or simply run it out of its meager MP completely). A White Mage could also silence it to prevent Garula from changing itself back (and keep it in an endless loop of trying to untoad itself).
* More fun with status effects: Blue Mages with Flash can make Garula significantly less threatening. White Mages should obviously use Protect. Freelancers can use the Whip drop from Magisa to lock Garula into paralysis.
* Monks should use Focus to avoid effectively half of Garula's counter attacks.
* Any party with a Knight can put the other three allies at near-death while having the Knight use Guard every round, automatically covering any ally taking damage with the Knight taking none. Alternatively, using the Iron Shield/Armor and Mythril Helmet from North Mountain will make a Knight indestructible beyond Sap. As usual, use Counter for bonus damage.
* Thieves should steal Mythril Daggers from Wyverns (or Y-Burns for you purists) to gain some much-needed offense. Ice Soldiers also have Mythril Swords to steal for Knights and Blue Mages.
|
|
|
Name: Shiva | Shiva | Shiva (Human, Heavy)
Stats: 1500HP | 1000MP | LVL 11
Defenses: PD 0 | PE 0% | MD 0 | ME 0%
Weak to Fire. Absorbs Ice.
Vulnerable to Poison, Blind, Slow.
|
Attack Patterns: * This is a difficult battle if you try it as soon as it's accessible. Luckily, this fight can be done at any time before you finish World 1, so you can always come back and try again later.
* As far as trying this fight ASAP, your best bet is stopping the Commanders with status effects. Blue Mages can use Flash to make them miss attacks and Toad Song (gotten in the same dungeon!) to flat-out nullify them. Black Mages can do the same with Sleep. White Mage has Protect to weaken their attacks. Of course, none of this really helps against Shiva...
* Your next option is to visit the Tower of Walse. Ricard Mages there have Flame Rods as a rare drop, and breaking one or two of those should end the battle easily, assuming you can equip them. *
* If the above is not an option, then wait until you get the Water Crystal jobs. Mystic Knight will have Fire and Sleep sword to help, Time Mage can use Slow on Shiva and the Commanders, Summoner can use Remora to stun the Commanders, and Red Mage may add more flexibility to your team. And of course, you might unlock a new job that can break rods if you're doing a fiesta or challenge run.
* If that still isn't enough, going to Karnak and then back should definitely help. Black Mages, Red Mages, and Mystic Knight get a major damage boost with Fira. White Mages and Red Mages get Confuse for the Commanders and Cura to heal through Shiva's damage. Flame Rods can be bought there and those will trivialize this fight. And even beyond that, you'll have plenty of upgraded gear and maybe a few more levels after all that, which should help significantly.
* If that still isn't enough, then just come back later. Wait until the end of World 1 if you want, or just skip Shiva entirely since she's optional and honestly it's pointless to grab her if you're not using Summoner or trying to get all summons/bestiary entries or whatever. |
 |
Name: Commander | IceComandr | Ice Commander (Human)
Stats: 600HP | 200MP | LVL 4
Defenses: PD 0 | PE 10% | MD 0 | ME 0%
Weak to Fire. Absorbs Ice.
Vulnerable to Death, Stone, Toad, Poison, Blind, Old, Sleep, Paralyze, Confuse, Berserk, Silence, Stop, Slow.
|
|
   |
FORM 1 (Human) Name: LiquiFlame | LiqudFlame | Liquid Flame
Stats: 3000HP | 100MP | LVL 19
Defenses: PD 0 | PE 20% | MD 15 | ME 0%
Weak to Ice. Absorbs Fire, Air.
Vulnerable to Death, Confuse.
FORM 2 (Hand)
Name: LiquiFlame | LiqudFlame | Liquid Flame (Heavy)
Stats: 3000HP | 30MP | LVL 19
Defenses: PD 0 | PE 10% | MD 30 | ME 0%
Absorbs Fire. Immune to Water, Air, Earth, Holy, Poison, Lightning, Ice.
Vulnerable to Death, Confuse.
FORM 3 (Tornado)
Name: LiquiFlame | LiqudFlame | Liquid Flame
Stats: 3000HP | 50MP | LVL 19
Defenses: PD 0 | PE 30% | MD 0 | ME 15%
Weak to Ice. Absorbs Fire, Air. Immune to Water, Poison.
Vulnerable to Death, Confuse.
|
Attack Patterns: Whenever Liquid Flame takes damage, it will perform a counter-attack depending on its current form and then change into one of its other two forms. The human form will either do physical attacks or Blaze, a fire attack that hurts everyone for MaxHP/4 damage. When hit, it counters with Blaze. The hand form does physical attacks, including a special attack that can inflict paralysis. Attacking it causes it to counter with a single-target Fira. The tornado phase does nothing but cast Fira on itself, healing it. Attacking this form has it counter with Magnet, which brings a back-row member to the front row (but does nothing otherwise). TIPS: * Liquid Flame has low MP, so a good strategy is to let it waste its MP on casting Fira on itself during its Tornado form. This won't affect Blaze, but it means the Tornado form gives you time to breathe and heal for future rounds without undoing the damage you've done to it, letting you go for pure offense for the other two forms. If doing so, consider killing off Berserkers beforehand so they don't mess up the phase changes. * As you may expect, Ice magic is powerful against this boss, though the Hand form is immune to Ice. This means Blizzara Sword will do nothing to it, so be sure to have a regular physical attack ready to force a form change. * It's vulnerable to Confuse in all three forms, though I haven't tested yet to see how effective a strategy confusing it would be. * Focus is useful here since using it means less counter-attacks to deal with. |
  |
Name: Sergeant | Sergeant | Sergeant Stats: 1000HP | 25MP | LVL 0 Defenses: PD 0 | PE 0% | MD 10 | ME 10% Vulnerable to Death, Stone, Poison, Blind, Old, Sleep, Paralyze, Confuse, Berserk, Silence, Stop, Slow. Name: Karnak | Karnak | Cur Nakk (Creature) Stats: 140HP | 25MP | LVL 19 Defenses: PD 0 | PE 0% | MD 0 | ME 20% Vulnerable to Death, Stone, Toad, Poison, Blind, Old, Sleep, Paralyze, Confuse, Berserk, Silence, Stop, Slow. Name: Iron Claw | Iron Claw | Iron Claw Stats: 900HP | 150MP | LVL 39 Defenses: PD 20 | PE 0% | MD 10 | ME 10% Vulnerable to all status effects. |
Attack Patterns: The Sergeant does nothing but orders the Cur Nakk dogs to attack the party. When the Sergeant is alone, they transform into Iron Claw. Iron Claw uses physical attacks and Death Claw, which paralyzes a target and puts them at single-digit HP. TIPS: * Unless you want a Blue Mage to learn Death Claw, there's no reason to fight the Iron Claw. You can get around the fight simply by killing the Sergeant before the Cur Nakks. * Otherwise, these enemies are susceptible to a wide variety of status effects, though with the time limit going on it'd be faster to just go all-out on offense. |
 |
Name: Ifrit | Ifrit | Ifrit (Heavy)
Stats: 3000HP | 1000MP | LVL 22
Defenses: PD 10 | PE 20% | MD 20 | ME 10%
Weak to Water, Ice. Absorbs Fire. Immune to Poison.
Vulnerable to Death, Stone, Poison, Blind, Old, Paralyze, Confuse, Berserk, Silence, Stop, Slow.
|
Attack Patterns:
|
 |
Name: Byblos | Biblos | Byblos (Creature)
Stats: 3600HP | 1000MP | LVL 24
Defenses: PD 10 | PE 30% | MD 30 | ME 20%
Weak to Fire. Absorbs Water, Air, Earth, Holy, Poison, Lightning, Ice.
Vulnerable to Poison, Blind, Paralyze, Berserk, Slow.
|
Attack Patterns:
|
 |
Name: Ramuh | Ramuh | Ramuh (Human)
Stats: 4000HP | 300MP | LVL 21
Defenses: PD 20 | PE 10% | MD 5 | ME 10%
Absorbs Lightning.
Vulnerable to Death, Mini, Blind, Berserk, Stop, Slow.
|
Attack Patterns:
|
 |
Name: Sandworm | Sandworm | Sandworm (Desert, Heavy)
Stats: 3000HP | 10125MP | LVL 18
Defenses: PD 0 | PE 0% | MD 10 | ME 10%
Vulnerable to Slow.
|
Attack Patterns:
|
 |
Name: CrayClaw | Clay Claw | Cray Claw (Creature, Heavy)
Stats: 2000HP | 500MP | LVL 43
Defenses: PD 25 | PE 0% | MD 25 | ME 10%
Weak to Lightning. Absorbs Water.
Vulnerable to Death, Stone, Poison, Blind, Old, Sleep, Paralyze, Confuse, Berserk, Silence, Stop, Slow
|
Attack Patterns:
|
 |
Name: AdamanTiMi | Adamantaim | Adamantoise
Stats: 2000HP | 125MP | LVL 20
Defenses: PD 25 | PE 0% | MD 5 | ME 50%
Weak to Ice.
Vulnerable to Death, Poison, Blind, Old, Berserk, Silence, Slow.
|
Attack Patters:
|
 |
Name: Flamegun | FlameThrow | Flame Thrower Stats: 2400HP | 125MP | LVL 22 Defenses: PD 15 | PE 0% | MD 20 | ME 10% Weak to Lightning. Vulnerable to Stop, Slow. |
Attack Patterns:
|
 |
Name: Rocket | Rocket Gun | Rocket Launcher Stats: 2500HP | 200MP | LVL 23 Defenses: PD 20 | PE 0% | MD 15 | ME 10% Weak to Lightning. Vulnerable to Stop, Slow. |
Attack Patterns:
|
 |
Name: Sol Cannon | Soul Gun | Soul Cannon (Heavy)
Stats: 22500HP (effectively 12501) | 1000MP | LVL 36
Defenses: PD 5 | PE 0% | MD 10 | ME 10%
Weak to Lightning. Immune to Water, Air, Poison.
Vulnerable to Slow.
Name: Launcher | Launcher | Launcher (Heavy)
Stats: 10800HP (effectively 801) | 1000MP | LVL 50
Defenses: PD 0 | PE 0% | MD 10 | ME 10%
Immune to Water, Air, Poison.
Vulnerable to Stop, Slow.
|
Attack Patterns:
|
 |
FORM 1
Name: ArchaeAvis | Archeoavis | Archeoaevis (Heavy)
Stats: 1600HP | 2000MP | LVL 21
Defenses: PD 30 | PE 10% | MD 6 | ME 0%
Weak to Air. Immune to Earth.
Vulnerable to Blind, Slow.
FORM 2
Name: ArchaeAvis | Archeoavis | Archeoaevis
Stats: 1600HP | 2000MP | LVL 19
Defenses: PD 24 | PE 10% | MD 12 | ME 0%
Absorbs Ice. Immune to Earth.
Vulnerable to Blind, Slow.
FORM 3
Name: ArchaeAvis | Archeoavis | Archeoaevis (Heavy)
Stats: 1600HP | 2000MP | LVL 23
Defenses: PD 18 | PE 10% | MD 18 | ME 0%
Absorbs Fire. Immune to Earth.
Vulnerable to Blind, Slow.
FORM 4
Name: ArchaeAvis | Archeoavis | Archeoaevis
Stats: 1600HP | 2000MP | LVL 24
Defenses: PD 12 | PE 10% | MD 24 | ME 0%
Absorbs Lightning. Immune to Earth.
Vulnerable to Blind, Slow.
FORM 5
Name: ArchaeAvis | Archeoavis | Archeoaevis (Heavy)
Stats: 2500HP | 2000MP | LVL 20
Defenses: PD 6 | PE 10% | MD 30 | ME 0%
Immune to Air, Earth, Lightning, Ice, Fire.
Vulnerable to Blind, Slow.
|
Attack Patterns:
|
 |
Name: Puroboros | Byurobolos | Purobolos
Stats: 1500HP | 100MP | LVL 22
Defenses: PD 0 | PE 0% | MD 0 | ME 0%
Vulnerable to Death, Stone, Poison, Blind, Old, Sleep, Berserk, Silence, Stop, Slow.
|
Attack Patterns:
|
 |
Name: Titan | Titan | Titan (Human, Heavy)
Stats: 2500HP | 2000MP | LVL 1
Defenses: PD 10 | PE 10% | MD 0 | ME 0%
Absorbs Earth.
Vulnerable to Paralyze, Stop, Slow.
|
Attack Patterns:
|
 |
Name: Chim. Brain | KimaBrain | Manticore (Creature)
Stats: 3300HP | 1000MP | LVL 19
Defenses: PD 10 | PE 10% | MD 20 | ME 0%
Absorbs Ice.
Vulnerable to Death, Stone, Poison, Blind, Old, Berserk, Silence, Stop, Slow.
|
Attack Patterns:
|